popunder new

https://www.blogger.com/blog/posts/1739890295310631346

Wednesday, October 19, 2011

Create Custom Libraries in Windows 7 and Deploy Them Through Group Policy

Create Custom Libraries in Windows 7 and Deploy Them Through Group Policy

The library functionality was introduced within Windows 7 and provides users a single point of entry for specific data. For example, a company can have their data stored on several servers and for users it is not always clear what data can be found at which location. In such cases, the library can offer the users a great way to easily access the locations where the data is stored, with a single point of entry.Since it is not desired that the users will have to configure this themselves, I have written this post so that you can easily create your own company wide custom libraries.

Creating the custom library


  • Log on the Windows 7 VM with credentials which has access to the locations you wish to add to the libraries.

  • Open Windows Explorer.

  • In the right pane, right-click on a white part of the screen.

  • Select New -> Library.


Fill in the name for the Library.


  • Right click on the library and select Properties.

  • Add the locations you desire to add to this library.

  • Select the location you desire to set as the default location to save data to and click on “Set save location” to configure this.

  • Select what you want to optimize this library for.

  • Click OK


  • Goto %appdata%RoamingMicrosoftWindowsLibraries

  • Edit the file of your library with Notepad.


Under the line “<isLibraryPinned>true</isLibraryPinned>”, add the following line:
<iconReference>shell32.dll,96</iconReference>
Here you can specify a file with the icon you desire to represent this library.


Prepare the custom library for deployment


  • Goto %appdata%RoamingMicrosoftWindowsLibraries

  • Copy the file from the library you have just created to a location accessible from the network.


Deploy the custom library


  • Edit a user Group Policy.

  • Goto User Configuration -> Policies -> Windows Settings -> Scripts (Logon/Logoff) -> Logon.

  • Add a logon script which copies the library file from the network share to %appdata%RoamingMicrosoftWindowsLibraries


Script example:
copy \domainnetlogonLibrary name*.* %appdata%RoamingMicrosoftWindowsLibraries


Thursday, October 13, 2011

Unmount and Clean up a Wim Image using DISM

Unmount and Clean up a Wim Image using Deployment Image Servicing and Management (DISM)

DISM provides you an option to load Wim images onto your local drive and the service it offline. You can either add/remove a driver, enable/disable features, perform other customizations..without even installing them on a physical box. Now when you have mounted a Wim image, its really necessary to check if the image is mounted correctly. you can do that by running the command,  dism /get-MountedWiminfo.


Check the Status. If the Status is OK, then everything is good. If the Status is anything else., for eg: Needs Remount, Status Un-available, Invalid.. etc.. Its an indication that, you gotta’ remount (repair) the image. In this article, you will know how to Unmount, clean and remount a Wim image using the DISM tool.   


The screenshot above shows the mounted image status as “Invalid”.  This means that the mount point is corrupted and there may be resources associated with the mounted image that has been abandoned.  The cleanup command does not unmount a mounted image, nor does it delete images that can be recovered using the remount command.  You can use the cleanup command to delete these abandoned resources.  You can cleanup using the command syntax: dism /cleanup-wim


If the mounted image status shows as “Need-Remount”, you can run the remount command to recover the orphaned mount path.


Re-Mounting a Wim Image


When you have an issue with the mounted images as seen above, you will need have a need to re-mount the images which are mounted. This command will recover an orphaned Wim mount directory. You can re-mount using the command syntax.  dism /remount-wim /MountDir:<mountDir>


Un-Mounting a Wim Image


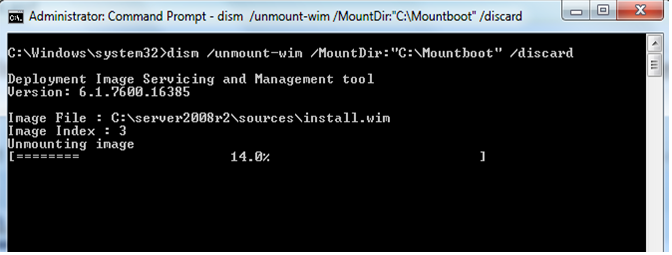
Once you are done with Servicing the Wim Image, you can unmount the image from your machine. Most of the IT Pros have asked this, what if they have forgot to save the changes, before they unmount. Thats how the DISM team has added this switch either to commit or discard the changes.  dism /unmount-Wim  /MountDir:<mountDir> /commit


Changes to WIM files are not “committed” until you do so specifically. You have three choices:


Unmount the image using the /Commit option (to save changes)


Use the /Commit option without unmounting (this keeps the image open so you can make more changes).


Unmount the image and use the /Discard option. In this case the image in the WIM file will be unchanged. This is used primarily as a manual “undo” of your changes.


 Cleaning up all Mounted Wim Images


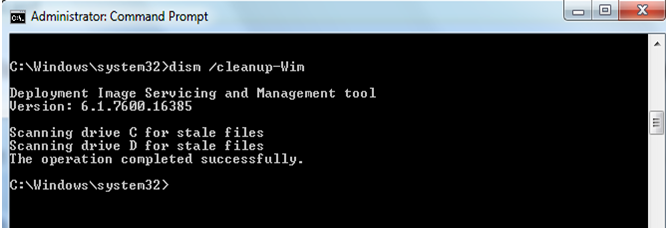
This operation will search for all the staleg up all Mounted Wim Images

or corrupted files in your machine and clean it up! – dism /cleanup-wim

The /Cleanup-Wim command is only used if there is any issue with the mount points, that means when any of the mounted images are shown as in the “Invalid” state.  You can run the cleanup command to delete these abandoned resources at the corrupted mount points.  There is no need to run the cleanup command every time when you are done with servicing the mounted images, but only when you run the /get-mountedwiminfo command and found that there are some mounted images showing the “Invalid” status. (as shown in the first screenshot in this article)

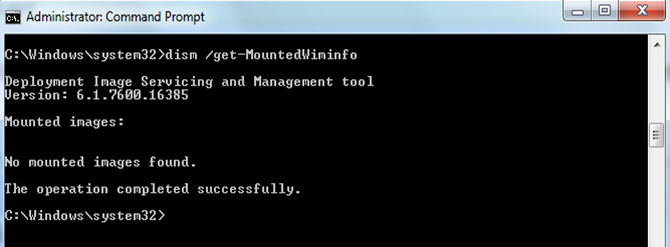
Since cleanup command only needs to be run when the /get-mountedwiminfo shows any mounted images in “Invalid” state, and the cleanup command does not unmount a mounted image, nor does it delete images that can be recovered using the remount command, running the /get-mountedwiminfo command after running the /cleanup-wim command usually still shows the mounted images with status no longer in the “Invalid” state instead of no mounted images as shown in the snapshot above.  Note that is very rare that a mounted images will be in the “Invalid” state, since it is rare that a mount point will become corrupted unless something weird has happened to the host system!

Saturday, October 8, 2011

GPEdit.MSC – Doesn’t show changes made to the registry?

GPEdit.MSC – Doesn’t show changes made to the registry?
That’s a question that came up a couple of times in the past, so I thought I’d write a few words about it. The question is:


“When I make changes to the registry that correspond to a Group Policy Setting, why doesn’t show GPEdit.msc (the GPEditor) the changed setting?”

That is due to how Windows applies GP settings to the registry.

What GPEdit writes and reads is not the registry directly but a intermediate file, called the Registry.POL. The POL file stores the changes and registry values that get incorporated by the Registry CSE (well, there’s some involvement with the ntuser.dat but that’s a different story). The point is that GPEdit reads/writes Registry.POL and the CSE is using that Registry.POL file to read the registry configuration off the the file to put it into the registry.

When making changes to the registry, the Registry CSE doesn’t care about the current state of the registry keys and values it changes - it just applies the settings governed by the POL file. In fact, it does wipe all values in the “four” special POLICY-hives and re-creates them according to the POL file. So - changes you make to the Registry are not carried out back to the POL file and therefore, GPEdit won’t look find them there.

What you will always see in GPEdit is what is configured in the Registry.POL file.