 dim svcName, sStart, sStop
 dim service
 dim objService
 dim SvrName
 dim input
 dim input2
 Dim svclist
 Dim compname
 dim objFile
 Set WshShell = WScript.CreateObject("WScript.Shell")
 on error resume next
 input = Inputbox ("Computer Name that you would like to Start or stop service on:"& vbCRLF & "Default is this pc", _
 "Stop or Start service","localhost")
 If input = "" Then
 WScript.Quit
 End If
 returnvalue=MsgBox ("Do you want display a list of services on remote pc?"& vbCRLF & "List will show the Service Short Name, the current State and the Service Display Name", 36, "Show Services")
 if returnvalue = 6 then
 Const ForWriting = 2
 Set objFSO = CreateObject("Scripting.FileSystemObject")
 Set objTextFile = objFSO.OpenTextFile _
 ("c:services list.txt", ForWriting, True)
 Set colServices = GetObject("winmgmts://" & input).ExecQuery _
 ("Select * from Win32_Service")
 objTextFile.WriteLine("Short Name") & VbTab & ("Current State") & VbTab & VbTab & ("Display Name")
 For Each objService in colServices
 objTextFile.WriteLine(objService.Name & VbTab & _
 objService.State & VbTab & VbTab & objService.DisplayName)
 Next
 objTextFile.Close
 WScript.Sleep 500
 wShshell.Run "notepad c:services list.txt"
 WScript.Sleep 500
 If input = "" Then
 WScript.Quit
 End If
 input2 = Inputbox ("Enter the Service name you want to start or stop:" & vbCRLF & "Use the services list.txt file to get service short name if you don't know it." & vbCRLF & "print spooler = spooler" & vbCRLF & "remote registry = remoteregistry" & vbCRLF & "Windows Event log = eventlog"& vbCRLF & "Default is Print Spooler" & vbCRLF & "","Service Name","spooler")
 If input2 = "" Then
 WScript.Quit
 End If
 SvrName = input
 svcName = input2
 Set service = GetObject("winmgmts:!\" & svrName & "rootcimv2")
 svc = "Win32_Service=" & "'" & svcName & "'"
 state = inputbox _
 ("Enter start or stop to Change the Status of Service" & vbCRLF & "lowercase only" & vbCRLF & "Default is start","start or stop","start")
 If state = "" Then
 WScript.Quit
 End If
 if state = "start" then
 Set objService = Service.Get(svc)
 retVal = objService.StartService()
 returnvalue=MsgBox ("Do you want re-open the services list.txt file and verify the state change?", 36, "Started the " & svcName & " service on " & SvrName)
 if returnvalue = 6 then
 Set objFSO = CreateObject("Scripting.FileSystemObject")
 Set objTextFile = objFSO.OpenTextFile _
 ("c:services list.txt", ForWriting, True)
 Set colServices = GetObject("winmgmts://" & input).ExecQuery _
 ("Select * from Win32_Service")
 objTextFile.WriteLine("Short Name") & VbTab & ("Current State") & VbTab & ("Display Name")
 For Each objService in colServices
 objTextFile.WriteLine(objService.Name & VbTab & _
 objService.State & VbTab & objService.DisplayName)
 Next
 objTextFile.Close
 WScript.Sleep 500
 wShshell.Run "notepad c:services list.txt"
 WScript.Sleep 500
 end if
 WScript.Quit
 elseif state = "stop" then
 Set objService = Service.Get(svc)
 retVal = objService.StopService()
 end if
 returnvalue=MsgBox ("Do you want re-open the services list.txt file and verify the state change?", 36, "Stopped the " & svcName & " service on " & SvrName)
 if returnvalue = 6 then
 Set objFSO = CreateObject("Scripting.FileSystemObject")
 Set objTextFile = objFSO.OpenTextFile _
 ("c:services list.txt", ForWriting, True)
 Set colServices = GetObject("winmgmts://" & input).ExecQuery _
 ("Select * from Win32_Service")
 objTextFile.WriteLine("Short Name") & VbTab & ("Current State") & VbTab & ("Display Name")
 For Each objService in colServices
 objTextFile.WriteLine(objService.Name & VbTab & _
 objService.State & VbTab & objService.DisplayName)
 Next
 objTextFile.Close
 WScript.Sleep 500
 wShshell.Run "notepad c:services list.txt"
 WScript.Sleep 500
 end if
 WScript.Quit
 end if
popunder new
Friday, December 23, 2011
VB Script to Remotely Start or Stop a windows service with get currentstate
Friday, December 16, 2011
Open Outlook 2003, 2007, 2010 or 2013 secure temp olk folderlocation.vbs script
 ' This script will open the Outlook Secure Temp folder location for Outlook
  ' 2003, 2007, 2010 and 2013
  Dim WshShell, strValue, openlocation
  Set WshShell = WScript.CreateObject(“WScript.Shell”)
  const HKEY_CURRENT_USER = &H80000001
  on error resume next
  strComputer = “.”
  Set oReg=GetObject(“winmgmts:{impersonationLevel=impersonate}!\” &_
  strComputer & “rootdefault:StdRegProv”)
  strKeyPath = “SoftwareMicrosoftOffice11.0OutlookSecurity”
  strValueName = “OutlookSecureTempFolder”
  oReg.GetStringValue HKEY_CURRENT_USER,strKeyPath,strValueName,dwValue
  If IsNull(dwValue) Then
  Else
  strKeyPath = “SoftwareMicrosoftOffice11.0OutlookSecurity”
  strValueName = “OutlookSecureTempFolder”
  oReg.GetStringValue HKEY_CURRENT_USER,strKeyPath,strValueName,strValue
  openlocation = “EXPLORER.exe /e,” & strValue
  wShshell.Run openlocation
  End If
  strKeyPath = “SoftwareMicrosoftOffice12.0OutlookSecurity”
  strValueName = “OutlookSecureTempFolder”
  oReg.GetStringValue HKEY_CURRENT_USER,strKeyPath,strValueName,dwValue
  If IsNull(dwValue) Then
  Else
  strKeyPath = “SoftwareMicrosoftOffice12.0OutlookSecurity”
  strValueName = “OutlookSecureTempFolder”
  oReg.GetStringValue HKEY_CURRENT_USER,strKeyPath,strValueName,strValue
  openlocation = “EXPLORER.exe /e,” & strValue
  wShshell.Run openlocation
  End If
  strKeyPath = “SoftwareMicrosoftOffice14.0OutlookSecurity”
  strValueName = “OutlookSecureTempFolder”
  oReg.GetStringValue HKEY_CURRENT_USER,strKeyPath,strValueName,dwValue
  If IsNull(dwValue) Then
  Else
  strKeyPath = “SoftwareMicrosoftOffice14.0OutlookSecurity”
  strValueName = “OutlookSecureTempFolder”
  oReg.GetStringValue HKEY_CURRENT_USER,strKeyPath,strValueName,strValue
  openlocation = “EXPLORER.exe /e,” & strValue
  wShshell.Run openlocation
  End If
  strKeyPath = “SoftwareMicrosoftOffice15.0OutlookSecurity”
  strValueName = “OutlookSecureTempFolder”
  oReg.GetStringValue HKEY_CURRENT_USER,strKeyPath,strValueName,dwValue
  If IsNull(dwValue) Then
  Else
  strKeyPath = “SoftwareMicrosoftOffice15.0OutlookSecurity”
  strValueName = “OutlookSecureTempFolder”
  oReg.GetStringValue HKEY_CURRENT_USER,strKeyPath,strValueName,strValue
  openlocation = “EXPLORER.exe /e,” & strValue
  wShshell.Run openlocation
  End If
  WScript.Quit
Friday, December 9, 2011
Proxy On OFF Switch with get current state v2
This script detects the current proxy state and depending on that sate prompts you to enable or disable it.
It also auomatically closes IE so the settings take effect immediately and then re- launches IE with the new settings.
The only variable thats needs to be changed is on line 37
Replace <Domain Proxy Server> with the IP or name of your domain proxy server without the brackets <> eg. ContosoProxy:80
  'Proxy On OFF Switch with get current state v2
  'Dec. 6, 2011
 Set WshShell = WScript.CreateObject("WScript.Shell")
 DimSetting = WshShell.RegRead ("HKCU\SOFTWARE\Microsoft\Windows\CurrentVersion\Internet Settings\ProxyEnable")
 If DimSetting = 1 Then
 'Wscript.Echo "Proxy is Currently Enabled"
 returnvalue=MsgBox ("Do you want to DISABLE the Proxy?", 36, "Proxy state is Currently ENABLED")
 if returnvalue = 6 then
 ' BEGIN CALLOUT A
 WshShell.RegWrite "HKCU\Software\Microsoft\Windows\" & _
      "CurrentVersion\Internet Settings\ProxyEnable", _
      0, "REG_DWORD"
 ' END CALLOUT A
 wShshell.Run "taskkill /im iexplore.exe",0,True
 WScript.Sleep 500 'give kill time to take effect
 'Inform User that the task is done.
 Mybox = MsgBox("Proxy is now disabled" ,vbOkOnly,"Proxy is Disabled")
 're-launch internet explorer
 wShshell.Run "iexplore.exe"
 End If
 WScript.Quit
 Else
 'Wscript.Echo "Proxy is Currently Disabled"
 End If
 'On Error Resume Next
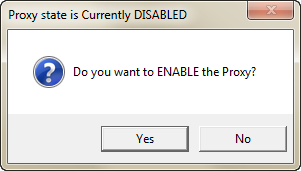
 returnvalue=MsgBox ("Do you want to ENABLE the Proxy?", 36, "Proxy state is Currently DISABLED")
 If returnvalue = "" Then
  WScript.Quit
 End If
 if returnvalue = 6 then
 ' BEGIN CALLOUT A
 'Replace <Domain Proxy Server> in line 50 with IP or your proxy server name without the <> eg. ContosoProxy:80
 WshShell.RegWrite "HKCU\Software\Microsoft\Windows\" & _
      "CurrentVersion\Internet Settings\ProxyEnable", _
      1, "REG_DWORD"
 WshShell.RegWrite "HKCU\Software\Microsoft\Windows\" & _
      "CurrentVersion\Internet Settings\ProxyServer","<Domain Proxy Server>:80", "REG_SZ"
 WshShell.RegWrite "HKCU\Software\Microsoft\Windows\" & _
      "CurrentVersion\Internet Settings\ProxyOverride","<local>", "REG_SZ"
 ' END CALLOUT A
 wShshell.Run "taskkill /im iexplore.exe",0,True
 WScript.Sleep 500 'give kill time to take effect
 'Inform User that the task is done.
 Mybox = MsgBox("Proxy is enabled and set to enter your companies proxy server",vbOkOnly,"Proxy Enabled")
 're-launch internet explorer
 wShshell.Run "iexplore.exe"
 End If
 WScript.Quit
Sunday, December 4, 2011
Get and edit a remote computers hosts file
 'script will get and allow you to edit a remote computers hosts file
 'it also changes the association for extensionless files like the hosts file to open with notepad
 'Get and open Remote Computers Hosts file
 on error resume next
 Set WshShell = Wscript.CreateObject("Wscript.Shell")
 strcomputer = inputbox("Enter remote computer name or leave as localhost for this computer","Get Hosts file","Localhost")
 If strComputer = "" Then
 WScript.Quit
 End If
 'Associate Extensionless Files with Notepad
 wshShell.run "%comspec% /c c: & assoc .=txtfile"
 WScript.Sleep 500 'give association time to take effect
 'open hosts file on remote
 wshShell.Run "\" & strcomputer & "c$WindowsSystem32driversetchosts"
Get a remote computers windowsupdate.log file
 'This script will get a remote computers windowsupdate.log file
 'it also changes the association for .log files to open with notepad
 'Get and open WindowsUpdate log file on remote Computer
 on error resume next
 Set WshShell = Wscript.CreateObject("Wscript.Shell")
 strcomputer = inputbox("Enter remote computer name or leave as localhost for this computer","Get WindowsUpdate.log file","Localhost")
 If strComputer = "" Then
 WScript.Quit
 End If
 'Associate .log Files with Notepad
 wshShell.run "%comspec% /c c: & assoc .log=txtfile"
 WScript.Sleep 500 'give association time to take effect
 'open WindowsUpdate.log file on remote computer
 wshShell.Run "\" & strcomputer & "c$WindowsWindowsUpdate.log""
Wednesday, October 19, 2011
Create Custom Libraries in Windows 7 and Deploy Them Through Group Policy
Create Custom Libraries in Windows 7 and Deploy Them Through Group Policy
Creating the custom library
- Log on the Windows 7 VM with credentials which has access to the locations you wish to add to the libraries.
- Open Windows Explorer.
- In the right pane, right-click on a white part of the screen.
- Select New -> Library.
Fill in the name for the Library.
- Right click on the library and select Properties.
- Add the locations you desire to add to this library.
- Select the location you desire to set as the default location to save data to and click on “Set save location” to configure this.
- Select what you want to optimize this library for.
- Click OK.
- Goto %appdata%RoamingMicrosoftWindowsLibraries
- Edit the file of your library with Notepad.
Under the line “<isLibraryPinned>true</isLibraryPinned>”, add the following line:
<iconReference>shell32.dll,96</iconReference>
Here you can specify a file with the icon you desire to represent this library.
Prepare the custom library for deployment
- Goto %appdata%RoamingMicrosoftWindowsLibraries
- Copy the file from the library you have just created to a location accessible from the network.
Deploy the custom library
- Edit a user Group Policy.
- Goto User Configuration -> Policies -> Windows Settings -> Scripts (Logon/Logoff) -> Logon.
- Add a logon script which copies the library file from the network share to %appdata%RoamingMicrosoftWindowsLibraries
Script example:
copy \domainnetlogonLibrary name*.* %appdata%RoamingMicrosoftWindowsLibraries
Thursday, October 13, 2011
Unmount and Clean up a Wim Image using DISM
Unmount and Clean up a Wim Image using Deployment Image Servicing and Management (DISM)
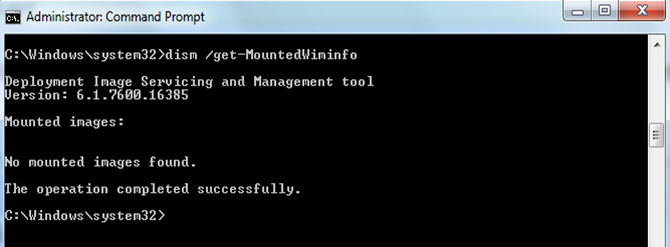
DISM provides you an option to load Wim images onto your local drive and the service it offline. You can either add/remove a driver, enable/disable features, perform other customizations..without even installing them on a physical box. Now when you have mounted a Wim image, its really necessary to check if the image is mounted correctly. you can do that by running the command, dism /get-MountedWiminfo.
Check the Status. If the Status is OK, then everything is good. If the Status is anything else., for eg: Needs Remount, Status Un-available, Invalid.. etc.. Its an indication that, you gotta’ remount (repair) the image. In this article, you will know how to Unmount, clean and remount a Wim image using the DISM tool. 
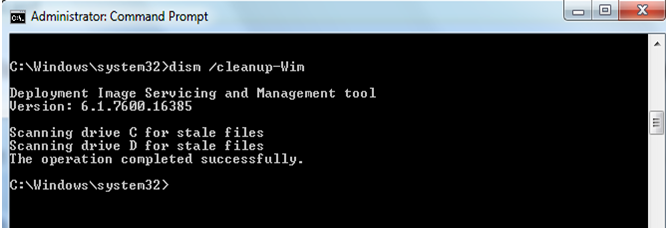
The screenshot above shows the mounted image status as “Invalid”. This means that the mount point is corrupted and there may be resources associated with the mounted image that has been abandoned. The cleanup command does not unmount a mounted image, nor does it delete images that can be recovered using the remount command. You can use the cleanup command to delete these abandoned resources. You can cleanup using the command syntax: dism /cleanup-wim
If the mounted image status shows as “Need-Remount”, you can run the remount command to recover the orphaned mount path.
Re-Mounting a Wim Image
When you have an issue with the mounted images as seen above, you will need have a need to re-mount the images which are mounted. This command will recover an orphaned Wim mount directory. You can re-mount using the command syntax. dism /remount-wim /MountDir:<mountDir>
Un-Mounting a Wim Image
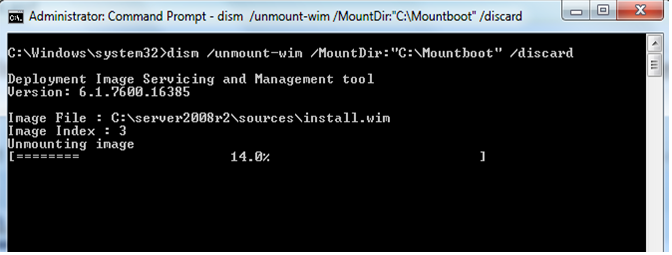
Once you are done with Servicing the Wim Image, you can unmount the image from your machine. Most of the IT Pros have asked this, what if they have forgot to save the changes, before they unmount. Thats how the DISM team has added this switch either to commit or discard the changes. dism /unmount-Wim /MountDir:<mountDir> /commit
Changes to WIM files are not “committed” until you do so specifically. You have three choices:
Unmount the image using the /Commit option (to save changes)
Use the /Commit option without unmounting (this keeps the image open so you can make more changes).
Unmount the image and use the /Discard option. In this case the image in the WIM file will be unchanged. This is used primarily as a manual “undo” of your changes.
Cleaning up all Mounted Wim Images
This operation will search for all the staleg up all Mounted Wim Images
or corrupted files in your machine and clean it up! – dism /cleanup-wim
The /Cleanup-Wim command is only used if there is any issue with the mount points, that means when any of the mounted images are shown as in the “Invalid” state. You can run the cleanup command to delete these abandoned resources at the corrupted mount points. There is no need to run the cleanup command every time when you are done with servicing the mounted images, but only when you run the /get-mountedwiminfo command and found that there are some mounted images showing the “Invalid” status. (as shown in the first screenshot in this article)
Since cleanup command only needs to be run when the /get-mountedwiminfo shows any mounted images in “Invalid” state, and the cleanup command does not unmount a mounted image, nor does it delete images that can be recovered using the remount command, running the /get-mountedwiminfo command after running the /cleanup-wim command usually still shows the mounted images with status no longer in the “Invalid” state instead of no mounted images as shown in the snapshot above. Note that is very rare that a mounted images will be in the “Invalid” state, since it is rare that a mount point will become corrupted unless something weird has happened to the host system!
Saturday, October 8, 2011
GPEdit.MSC – Doesn’t show changes made to the registry?
“When I make changes to the registry that correspond to a Group Policy Setting, why doesn’t show GPEdit.msc (the GPEditor) the changed setting?”
That is due to how Windows applies GP settings to the registry.
What GPEdit writes and reads is not the registry directly but a intermediate file, called the Registry.POL. The POL file stores the changes and registry values that get incorporated by the Registry CSE (well, there’s some involvement with the ntuser.dat but that’s a different story). The point is that GPEdit reads/writes Registry.POL and the CSE is using that Registry.POL file to read the registry configuration off the the file to put it into the registry.
When making changes to the registry, the Registry CSE doesn’t care about the current state of the registry keys and values it changes - it just applies the settings governed by the POL file. In fact, it does wipe all values in the “four” special POLICY-hives and re-creates them according to the POL file. So - changes you make to the Registry are not carried out back to the POL file and therefore, GPEdit won’t look find them there.
What you will always see in GPEdit is what is configured in the Registry.POL file.
Saturday, September 17, 2011
Complete List of Canonical Names of Control Panel Items
As of Windows Vista, each Control Panel item is given a canonical name for use in programmatically launching that item. This topic lists each Control Panel item, its canonical name, and its GUID.
Windows 7 Control Panel Canonical Names
The following canonical names are defined for Control Panel items in Windows 7. All names are also valid on Windows Vista unless specified otherwise. Not all Control Panel items are available on all varieties of Windows and some Control Panel items might appear only when appropriate hardware is detected. These canonical names do not change for different languages. They are always in English, even if the system's language is non-English.
| Control Panel Item | Canonical name | GUID |
|---|---|---|
| Action Center | Microsoft.ActionCenter (Windows 7 and later only) | {BB64F8A7-BEE7-4E1A-AB8D-7D8273F7FDB6} |
| Administrative Tools | Microsoft.AdministrativeTools | {D20EA4E1-3957-11d2-A40B-0C5020524153} |
| AutoPlay | Microsoft.AutoPlay | {9C60DE1E-E5FC-40f4-A487-460851A8D915} |
| Backup and Restore | Microsoft.BackupAndRestore (Windows 7 and later only) | {B98A2BEA-7D42-4558-8BD1-832F41BAC6FD} |
| Biometric Devices | Microsoft.BiometricDevices (Windows 7 and later only) | {0142e4d0-fb7a-11dc-ba4a-000ffe7ab428} |
| BitLocker Drive Encryption | Microsoft.BitLockerDriveEncryption | {D9EF8727-CAC2-4e60-809E-86F80A666C91} |
| Color Management | Microsoft.ColorManagement | {B2C761C6-29BC-4f19-9251-E6195265BAF1} |
| Credential Manager | Microsoft.CredentialManager (Windows 7 and later only) | {1206F5F1-0569-412C-8FEC-3204630DFB70} |
| Date and Time | Microsoft.DateAndTime | {E2E7934B-DCE5-43C4-9576-7FE4F75E7480} |
| Default Location | Microsoft.DefaultLocation (Windows 7 and later only) | {00C6D95F-329C-409a-81D7-C46C66EA7F33} |
| Default Programs | Microsoft.DefaultPrograms | {17cd9488-1228-4b2f-88ce-4298e93e0966} |
| Desktop Gadgets | Microsoft.DesktopGadgets (Windows 7 and later only) | {37efd44d-ef8d-41b1-940d-96973a50e9e0} |
| Device Manager | Microsoft.DeviceManager | {74246bfc-4c96-11d0-abef-0020af6b0b7a} |
| Devices and Printers | Microsoft.DevicesAndPrinters (Windows 7 and later only) | {A8A91A66-3A7D-4424-8D24-04E180695C7A} |
| Display | Microsoft.Display (Windows 7 and later only) | {C555438B-3C23-4769-A71F-B6D3D9B6053A} |
| Ease of Access Center | Microsoft.EaseOfAccessCenter | {D555645E-D4F8-4c29-A827-D93C859C4F2A} |
| Folder Options | Microsoft.FolderOptions | {6DFD7C5C-2451-11d3-A299-00C04F8EF6AF} |
| Fonts | Microsoft.Fonts | {93412589-74D4-4E4E-AD0E-E0CB621440FD} |
| Game Controllers | Microsoft.GameControllers | {259EF4B1-E6C9-4176-B574-481532C9BCE8} |
| Get Programs | Microsoft.GetPrograms | {15eae92e-f17a-4431-9f28-805e482dafd4} |
| Getting Started | Microsoft.GettingStarted (Windows 7 and later only) | {CB1B7F8C-C50A-4176-B604-9E24DEE8D4D1} |
| HomeGroup | Microsoft.HomeGroup (Windows 7 and later only) | {67CA7650-96E6-4FDD-BB43-A8E774F73A57} |
| Indexing Options | Microsoft.IndexingOptions | {87D66A43-7B11-4A28-9811-C86EE395ACF7} |
| Infrared | Microsoft.Infrared (Windows 7 and later only) | {A0275511-0E86-4ECA-97C2-ECD8F1221D08} |
| Internet Options | Microsoft.InternetOptions | {A3DD4F92-658A-410F-84FD-6FBBBEF2FFFE} |
| iSCSI Initiator | Microsoft.iSCSIInitiator | {A304259D-52B8-4526-8B1A-A1D6CECC8243} |
| Keyboard | Microsoft.Keyboard | {725BE8F7-668E-4C7B-8F90-46BDB0936430} |
| Location and Other Sensors | Microsoft.LocationAndOtherSensors (Windows 7 and later only) | {E9950154-C418-419e-A90A-20C5287AE24B} |
| Mouse | Microsoft.Mouse | {6C8EEC18-8D75-41B2-A177-8831D59D2D50} |
| Network and Sharing Center | Microsoft.NetworkAndSharingCenter | {8E908FC9-BECC-40f6-915B-F4CA0E70D03D} |
| Notification Area Icons | Microsoft.NotificationAreaIcons (Windows 7 and later only) | {05d7b0f4-2121-4eff-bf6b-ed3f69b894d9} |
| Offline Files | Microsoft.OfflineFiles | {D24F75AA-4F2B-4D07-A3C4-469B3D9030C4} |
| Parental Controls | Microsoft.ParentalControls | {96AE8D84-A250-4520-95A5-A47A7E3C548B} |
| Pen and Touch | Microsoft.PenAndTouch (Windows 7 and later only) | {F82DF8F7-8B9F-442E-A48C-818EA735FF9B} |
| People Near Me | Microsoft.PeopleNearMe | {5224F545-A443-4859-BA23-7B5A95BDC8EF} |
| Performance Information and Tools | Microsoft.PerformanceInformationAndTools | {78F3955E-3B90-4184-BD14-5397C15F1EFC} |
| Personalization | Microsoft.Personalization | {ED834ED6-4B5A-4bfe-8F11-A626DCB6A921} |
| Phone and Modem | Microsoft.PhoneAndModem (Windows 7 and later only) | {40419485-C444-4567-851A-2DD7BFA1684D} |
| Power Options | Microsoft.PowerOptions | {025A5937-A6BE-4686-A844-36FE4BEC8B6D} |
| Programs and Features | Microsoft.ProgramsAndFeatures | {7b81be6a-ce2b-4676-a29e-eb907a5126c5} |
| Recovery | Microsoft.Recovery (Windows 7 and later only) | {9FE63AFD-59CF-4419-9775-ABCC3849F861} |
| Region and Language | Microsoft.RegionAndLanguage (Windows 7 and later only) | {62D8ED13-C9D0-4CE8-A914-47DD628FB1B0} |
| RemoteApp and Desktop Connections | Microsoft.RemoteAppAndDesktopConnections (Windows 7 and later only) | {241D7C96-F8BF-4F85-B01F-E2B043341A4B} |
| Scanners and Cameras | Microsoft.ScannersAndCameras | {00f2886f-cd64-4fc9-8ec5-30ef6cdbe8c3} |
| Sound | Microsoft.Sound (Windows 7 and later only) | {F2DDFC82-8F12-4CDD-B7DC-D4FE1425AA4D} |
| Speech Recognition | Microsoft.SpeechRecognition (Windows 7 and later only) | {58E3C745-D971-4081-9034-86E34B30836A} |
| Sync Center | Microsoft.SyncCenter | {9C73F5E5-7AE7-4E32-A8E8-8D23B85255BF} |
| System | Microsoft.System | {BB06C0E4-D293-4f75-8A90-CB05B6477EEE} |
| Tablet PC Settings | Microsoft.TabletPCSettings | {80F3F1D5-FECA-45F3-BC32-752C152E456E} |
| Taskbar and Start Menu | Microsoft.TaskbarAndStartMenu | {0DF44EAA-FF21-4412-828E-260A8728E7F1} |
| Text to Speech | Microsoft.TextToSpeech | {D17D1D6D-CC3F-4815-8FE3-607E7D5D10B3} |
| Troubleshooting | Microsoft.Troubleshooting (Windows 7 and later only) | {C58C4893-3BE0-4B45-ABB5-A63E4B8C8651} |
| User Accounts | Microsoft.UserAccounts | {60632754-c523-4b62-b45c-4172da012619} |
| Windows Anytime Upgrade | Microsoft.WindowsAnytimeUpgrade | {BE122A0E-4503-11DA-8BDE-F66BAD1E3F3A} |
| Windows CardSpace | Microsoft.CardSpace | {78CB147A-98EA-4AA6-B0DF-C8681F69341C} |
| Windows Defender | Microsoft.WindowsDefender | {D8559EB9-20C0-410E-BEDA-7ED416AECC2A} |
| Windows Firewall | Microsoft.WindowsFirewall | {4026492F-2F69-46B8-B9BF-5654FC07E423} |
| Windows Mobility Center | Microsoft.MobilityCenter | {5ea4f148-308c-46d7-98a9-49041b1dd468} |
| Windows SideShow | Microsoft.WindowsSideShow | {E95A4861-D57A-4be1-AD0F-35267E261739} |
| Windows Update | Microsoft.WindowsUpdate | {36eef7db-88ad-4e81-ad49-0e313f0c35f8} |
Friday, September 16, 2011
Finding that specific Group Policy Setting
Well, there are a couple of steps you can use.
Check whether there’s a built-in GPO
Your first step probably is to check if there’s a ready-to-go GPO you can deploy. For that, you can fire up GPMC and check there. But other than browsing through the GPEditor tree or using the GPMC search, there are other two additional options. Those are good when you are with a customer and can’t get your hands on a machine with GPMC loaded. The first option is one of the coolest Azure apps I’ve seen: http://gps.cloudapp.net. GPS stands for Group Policy Search – you can search for GPOs by name or browse the GPO tree “virtually”. You can get it from any machine with internet access. If you’re more the download-n-go kind of guy, someone who sticks with references, there’s a GPO reference Excel spreadsheet: http://www.microsoft.com/downloads/en/details.aspx?FamilyID=18c90c80-8b0a-4906-a4f5-ff24cc2030fb&displaylang=en. They contain the setting names, the registry location the settings change, the path to browse and the “supported on” information. All searchable – and filterable, excel-like. That should get you going.
By now, you should know if there’s a built-in GPO you can use. In case you found what you were searched, consider yourself done with this article. If not, read on.
Check whether there’s a custom ADM(X) template
So no luck with the built-in stuff. Good thing there’s the community and fine places you can find and download ADM(X) templates from. ADM(X) templates are simply templates you can add to Group Policy Editor – based on the information in the template, the correct registry settings are forced on the client. Reading this, you probably noticed that this only works for registry settings, so it’ll only add “Administrative Templates” settings. There are ADM template files for pre-Vista GPMC administrators and ADMX template files for Vista+ GPMC administrators. Vista+ GPMC understands ADM, too, but XP’s GPMC only eats ADM template files. So be sure to search and find for the correct format.
For Microsoft Office, there are downloadable ADM(X) template files around: http://www.microsoft.com/downloads/en/details.aspx?displaylang=en&FamilyID=92d8519a-e143-4aee-8f7a-e4bbaeba13e7 and http://www.microsoft.com/downloads/en/details.aspx?FamilyID=64b837b6-0aa0-4c07-bc34-bec3990a7956&displaylang=en. No biggie to find them. ADM templates can be imported in GP Editor by clicking the “Administrative Templates” node and choosing “Add/Remove template”. For ADMX, you’ll have to either copy the files to the CentralStore or to the local PolicyDefinitions folder and re-open the GPEditor. It appears that I have created a link list for ADM template files in the past: http://www.frickelsoft.net/blog/?p=38, you may find other ADM template using Bing or Google or any other search engine. If you’re familiar with German, at least a bit, you can check Mark Heitbrink’s Group Policy site in German. He has a ton of ADM template files you can download and adjust: http://www.gruppenrichtlinien.de/index.html?/adm/Beispiele.htm. #24 for Adobe Reader is a real pearl :-) Also, I’ve found http://www.appdeploy.com has some good tips for you. They not only have tips and tricks about zero-touch installations, unattended installer packages and script installations, I’ve seen a couple of good ADM templates there. Worth a try!
Tracing the software setting’s steps
Still not lucky? Okay, time to get our hands dirty. When you change a setting, close the application and re-open it, the setting needs to get stored somewhere. Pretty likely that’s some place in the registry or some ugly .ini file. You only need to find where. There are tools that help you with that. Regshot is one of these great tools for free. You create a “before” snapshot of the registry, then open your app, change the setting, close it and make a “after” snapshot. You then compare the two and find the changes the software setting obviously had to make: http://sourceforge.net/projects/regshot/. There are other tools out there. Process Monitor (formerly FileMon and Regmon) is a great tool that helps you trace file and registry operations and filter for applications: http://technet.microsoft.com/en-us/sysinternals/bb795533.
Once you’ve found the location and the values a switch flip in your application changes, you’ll just have to deploy them via Group Policy. There are numerous ways – but today, you don’t want to use most them anymore. For a registry change, you can
(1) Write a custom ADM template file and import it: http://gandalf50.wordpress.com/2011/09/09/modifying-the-office-2010-adm-templates-to-allow-more-trusted-locations/
(2) Create a registry export on a sample machine and import it via a script: “regedit.exe /s myReg.reg”
(3) Use GP Preferences Registry settings to deploy the changes all at once!
Clearly, option 3 is the way to go. Creating custom ADM templates is… well, not too easy. Scripting is … yeah, so 1990.
Thursday, September 15, 2011
How to Add AD user accounts or groups into the local Administrators group with GPO
This article describes the feature “Restricted Groups” in Group Policy. This feature enables you - as the administrator - to configure group memberships on the client computers or member servers. You can add user accounts to groups on client machines that are in the scope of the policy.
As there are many questions about this in the newsgroups, I will come up with an example that shows how to put a group of Active Directory users into the local Administrators group on the clients.
For this article, I assume that you already created a global security group containing all users that shall become local Administrators on some client computers. In my example, the group is called “localAdmins”. The target (= client) computers reside in a specific OU.
If you’re using the Group Policy Editor, you navigate to the OU where the client computers reside and right-click it. Choose “Properties” and “Group Policy” where you create a new Policy and click “Edit”. You then navigate to:
Computer ConfigurationWindows SettingsSecurity Settings and then right-click “Restricted Groups” and choose “Add Group”.

You simply add the created group by clicking You simply add the created group by clicking “Browse..” or typing the group name into the box.

After clicking “OK”, another window opens up, where you can find two boxes. The upper box, saying “Members of this group”, the lower one saying “This group is a member of”. In my case above I am adding a group called TechSupport.
If you added users or groups into the “Members of this group” box, you would advise the Restricted Groups feature to put the users and groups you selected into the localAdmins group. Restricted Groups would then replace the current members of the localAdmins group with the users and groups you filled into the box. Please understand that it replace them by wipeing existing users out of the local Admins group.
Since we do not want to add users or other groups to our existing group, but instead want to add a new group to the local Administrators group on all of our clients, we have a look at the lower box - labeled “This group is member of”. We click “Add” and type in the name of the group that we want added to the localAdmins on each client. In this case, it's “Administrators”. We then simply click “OK” and “Apply” and close all windows. “This group is member of” advices “Restricted Groups” to add our localAdmins group into the “Administrators” group of the clients. The existing group members will not be touched - it simply adds in this case the TechSupport group to every clients local administrators group.

Monday, September 12, 2011
You experience a long domain logon time in Windows 7 or in Windows Server 2008 R2 after you deploy Group Policy preferences to the computer
There’s a hotfix for Win7 and Server 2008 R2 available.
Friday, September 9, 2011
Modifying the Office 2010 ADMX Templates to allow more trusted locations
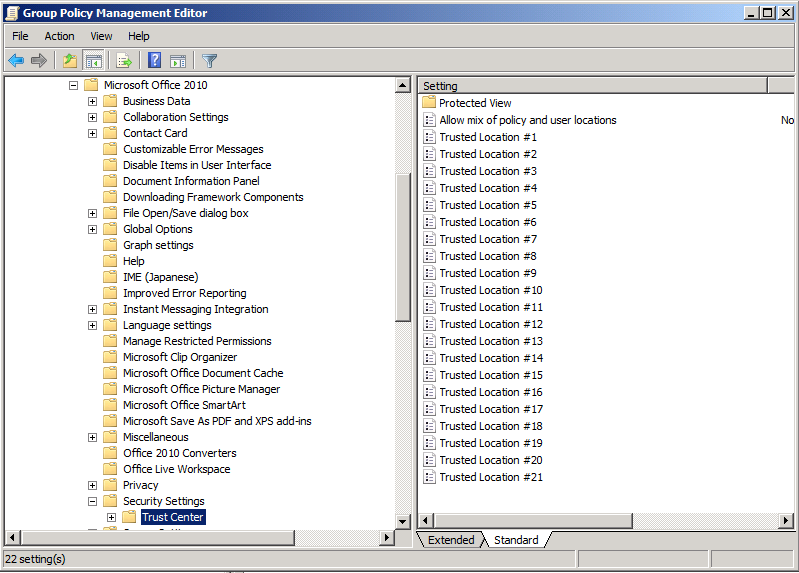
in the office2010.admx file search for location20
then insert the below on line 4517
<policy name="L_TrustedLoc21" displayName="$(string.L_TrustedLoc21)" explainText="$(string.L_OfficeTrustedLocationsExplain)" presentation="$(presentation.L_TrustedLoc21)" key="softwarepoliciesmicrosoftoffice14.0commonsecuritytrusted locationsall applicationslocation21">
<parentCategory ref="L_trustcenter241" />
<supportedOn ref="windows:SUPPORTED_WindowsVista" />
<elements>
<text id="L_pathcolon318" valueName="path" expandable="true" />
<text id="L_datecolon319" valueName="date" />
<text id="L_descriptioncolon320" valueName="description" />
<boolean id="L_allowsubfolders321" valueName="allowsubfolders">
<trueValue>
<decimal value="1" />
</trueValue>
<falseValue>
<decimal value="0" />
</falseValue>
</boolean>
</elements>
</policy>
in the office2010.adml
search for <string id="L_TrustedLoc20">Trusted Location #20</string>
add after it the below for 21
<string id="L_TrustedLoc21">Trusted Location #21</string>
search for <presentation id="L_TrustedLoc20">
add at the end of it the below for 21
<presentation id="L_TrustedLoc21">
<textBox refId="L_pathcolon318">
<label>Path:</label>
</textBox>
<textBox refId="L_datecolon319">
<label>Date:</label>
</textBox>
<textBox refId="L_descriptioncolon320">
<label>Description:</label>
</textBox>
<checkBox refId="L_allowsubfolders321">Allow sub folders:</checkBox>
</presentation>
Once done making the edits copy the new office2010.admx to C:windowssyvoldomainpoliciespolicy definitions and the new office2010.adml to the C:windowssyvoldomainpoliciespolicy definitionsen-us
When you restart your Group Policy Management Editor you should see the new location
Once the GPO has been applied on a windows client in Office the trusted loactions will show the new 21st location
Saturday, September 3, 2011
Customize The User Template on your Mac Leopard and Snow Leopard systems
At the heart of this practice is a default set of user data, carefully designed around the needs of the group and applied to each account when it’s first created. For Windows that data is typically stored in C:Documents and SettingsDefault User, while Unix systems have traditionally used /etc/skel. Mac OS X keeps its user template deep within the /System hierarchy, but while finding it can be difficult, customizing it to your needs is quite easy.
Start with a new account created specifically for this purpose. Choose the system preferences, dock items, browser bookmarks, server shortcuts, and application settings appropriate to your user base, leaving out anything you can instead control via Open Directory’s managed preferences. If you install individual applications or fonts on a per-user level, include those in ~/Applications and ~/Library/Fonts (where the tilde represents the user’s home directory).
Once you’ve finished, open Keychain Access from the /Applications/Utilities folder and delete the “login” keychain (both references and files when prompted) so new users will get their own keychain file created for them. You’ll also want to delete the cache files stored in ~/Library/Caches, clear out the “Recent Items” from the Apple menu, and (if you’ve used the Terminal) discard the ~/.bash_history file.
Now log out of the template, and log in to an Admin account. From here, you’ll be clearing Apple’s existing user template and copying your new template user in its place. In Leopard, that work can’t be done using the sudo command, and instead must be performed as the root user, meaning you run the risk of doing serious damage if you don’t understand what you’re typing. If you’re at
peace with that, just open the Terminal, and very carefully type:
su -
After prompting you for a password, this will let you assume the role of root, the Unix “superuser”. This allows you to modify and delete any file on the machine.
rm -r /System/Library/User Template/English.lproj/*
This removes everything inside the English-speaking template folder. If you’re utilizing another language, you’ll need to change this to the appropriate template.
cp -R /Users/TEMPLATE/* /System/Library/User Template/English.lproj/
In the command above, replace TEMPLATE with the actual name of the template account you’ve created. This copies your prepared user environment into the template location. After which you can:
exit
Now, when you add a new user account, it’ll be created with your customizations already in place. You can then delete the original account from the install you built it on, but be sure to back up the home directory. The process can be repeated on multiple machines, deployed on your server, or incorporated into a system image, all using the same template.
Batch file to start or stop a service depending on its current state
Just replace yourservice on line 5 and 16 with the name of the service you want to stop or start.
 @ECHO OFF
 REM Checking Service state
 REM replace yourservice below with the name of the service
 net start yourservice 2>nul
 if errorlevel 2 goto AlreadyRunning
 if errorlevel 1 goto Error
 REM Service started
 GOTO ContinueWithBatch
 :AlreadyRunning
 REM Service is already running
 REM replace yourservice below with the name of the service
 net stop yourservice
 GOTO ContinueWithBatch
 :Error
 REM Service failed to start
 GOTO ContinueWithBatch
 :ContinueWithBatch
Wednesday, August 31, 2011
VBS Script to force a Wsus update detection on a single computer
 ' Force a Windows Update Detection now on single computer by inputing name or IP of computer
 'Script is now ignoring errors. For those who wish to see errors just add a ' to the on error resume next below
 on error resume next
 strComputer = inputbox("Enter a computer name or IP address to run a WUA detection now","Invoke detectnow")
 if strComputer = "" then wscript.quit
 Set autoUpdateClient = CreateObject("Microsoft.Update.AutoUpdate",strComputer)
 AutoUpdateClient.detectnow()
 wscript.echo "All done."
Tuesday, August 30, 2011
VBS Script to Start the remote registry service
 ' RemoteRegistryservicestart.vbs
  ' script to Start Remote Registry on strComputer
  Option Explicit
  Dim objWMIService, objItem, objService
  Dim colListOfServices, strComputer, strService, strInput
  strInput = False
  ' Creates the Input Message Box
  Do
  strComputer = InputBox("Which Machine? "_
  ," Remote Machine", strComputer)
  If strComputer <> "" Then strInput = True
  Loop Until strInput = True
  ' NB Spelling of RemoteRegistry (No space).
  strService = " 'RemoteRegistry' "
  Set objWMIService = GetObject("winmgmts:" _
  & "{impersonationLevel=impersonate}!\" _
  & strComputer & "rootcimv2")
  Set colListOfServices = objWMIService.ExecQuery _
  ("Select * from Win32_Service Where Name ="_
  & strService & " ")
  For Each objService in colListOfServices
  WSCript.Sleep 1500
  objService.StartService()
  Next
  WScript.Echo "Started " & strService & " on " & strComputer
  WScript.Quit
VBS Script to Find all Outlook pst files on C and D Drives
 'Find all Outlook pst files on C and D Drives
 strComputer = "."
 on error resume next
 set wshnetwork=createobject("wscript.network")
 scomputername=wshnetwork.computername
 set wshnetwork=nothing
 Const OverwriteExisting = True
 Set objWMIService = GetObject("winmgmts:\" & strComputer & "rootcimv2")
 Set colFiles = objWMIService.ExecQuery _
 ("Select * from CIM_DataFile Where Extension = 'pst' AND (Drive = 'C:' OR Drive = 'D:')")
 If colFiles.Count = 0 Then
 Wscript.Quit
 End If
 Set objFSO = CreateObject("Scripting.FileSystemObject")
 Set objFolder = objFSO.CreateFolder("C:pstlog")
 Set objTextFile = objFSO.CreateTextFile("c:pstlogpst_files_on_" & scomputername & ".txt " , True)
 For Each objFile in colFiles
 objTextFile.Write(objFile.Drive & objFile.Path & "")
 objTextFile.Write(objFile.FileName & "." & objFile.Extension & ", Size ")
 objTextFile.Write(objFile.FileSize /1024 & "kb" & vbCrLf)
 Next
 objTextFile.Close
VBS Script to enable or disable remote desktop on a remote system

 ' This script will enable or disable remote desktop on a remote system
 const HKEY_LOCAL_MACHINE = &H80000002
 strComputer = InputBox("Enter the COMPUTER NAME of the system you would like to enable or disable Remote Desktop: leave as localhost for this computer","Enable or Disable Remote Desktop","Localhost")
 If strComputer = "" Then
 WScript.Quit
 End If
 Set StdOut = WScript.StdOut
 On Error Resume Next
 Set oReg=GetObject("winmgmts:{impersonationLevel=impersonate}!\" &_
 strComputer & "rootdefault:StdRegProv")
 If Err.Number <> 0 Then
 WScript.Echo "An error has occurred. You may have mistyped the computer name."
 WScript.Quit
 End If
 strKeyPath = "SYSTEMCurrentControlSetControlTerminal Server"
 strValueName = "fDenyTSConnections"
 oReg.GetDWORDValue HKEY_LOCAL_MACHINE,strKeyPath,strValueName,dwValue
 If dwValue = 1 Then
 prompt = MsgBox ("Remote Desktop is Currently disabled. Do you want to ENABLE it?", vbYesNo)
 If prompt = vbYes then
 dwValue = 0
 oReg.SetDWORDValue HKEY_LOCAL_MACHINE,strKeyPath,strValueName,dwValue
 WScript.Echo "Remote Desktop is now ENABLED on " & strComputer
 WScript.Quit
 ElseIf prompt = vbNo then
 WScript.Echo "Remote Desktop is still DISABLED."
 Wscript.Quit
 End If
 ElseIf dwValue = 0 then
 prompt = MsgBox ("Remote Desktop is Currently ENABLED. Do you want to DISABLE it?", vbYesNo)
 If prompt = vbYes then
 dwValue = 1
 oReg.SetDWORDValue HKEY_LOCAL_MACHINE,strKeyPath,strValueName,dwValue
 WScript.Echo "Remote Desktop is now DISABLED on " & strComputer
 WScript.Quit
 ElseIf prompt = vbNo then
 WScript.Echo "Remote Desktop is still ENABLED."
 WScript.Quit
 End If
 End If
Saturday, August 27, 2011
Using WinRAR SFX to Create a Silent Install Package
I use it almost daily to create silent install of applications that I need to push out to users on the network
In this guide I will show how to create a simple silent install of the popular FTP program called Filezilla
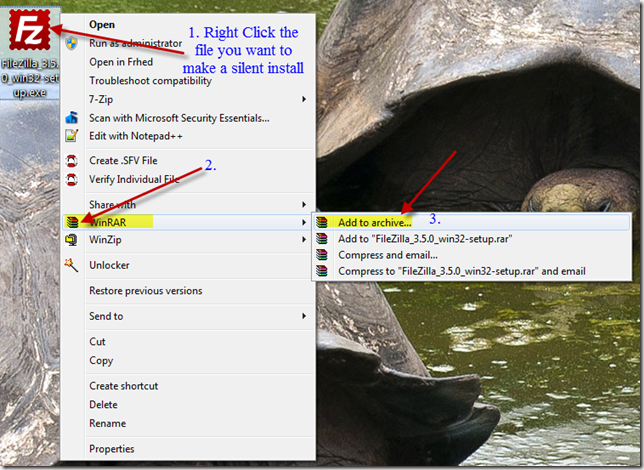
After you have WinRAR installed right click the filezilla installer package and select WinRAR> Add Archive
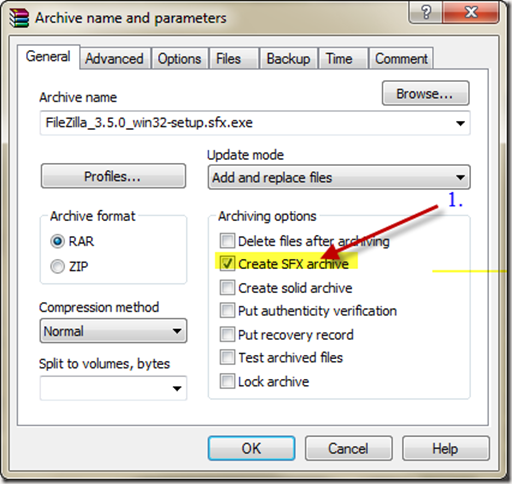
In the General pane select Create SFX archive
WinRAR will automatically crate a sfx exe version. Now right click that and select WinRAR > open with WinRAR
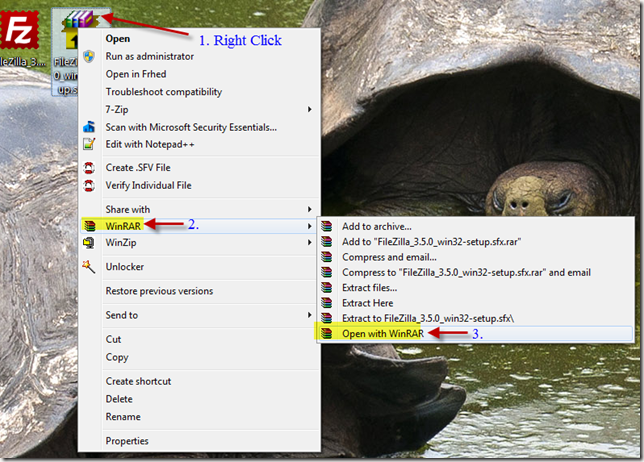
WinRAR opens with the filezilla setup program inside of it. Select the SFX icon and then select advanced SFX options.
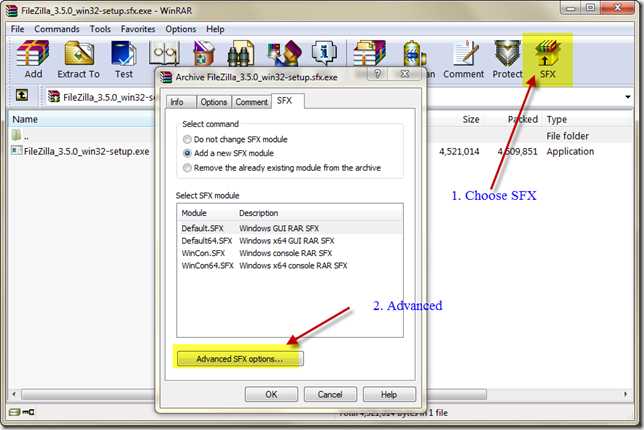
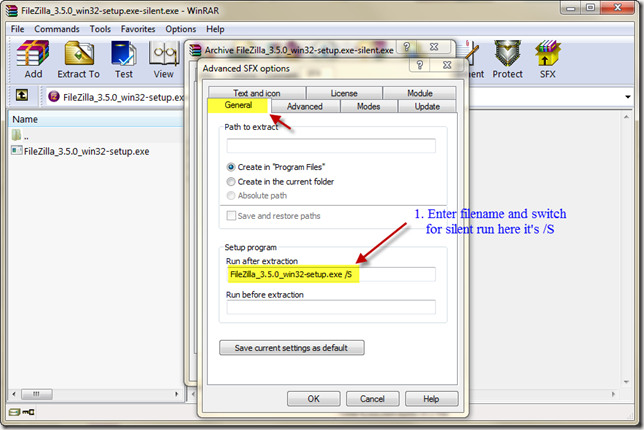
In the General Tab we will define the silent switch variable that runs filezilla silently . In this case it is /S so under Run after extraction we type the full filename and the /S switch.
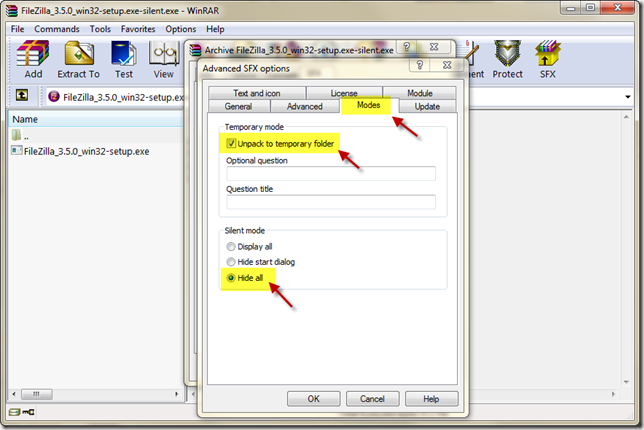
Under modes we make sure it unpacks to a temporary folder and Hides all displays.
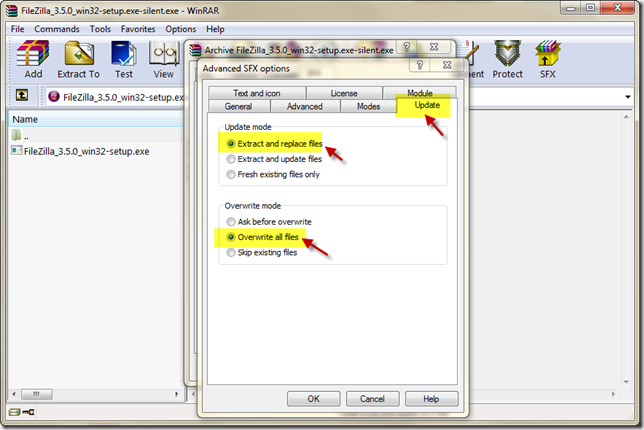
Under Update we will select the extract and replace files and the overwrite all files (This is done just in case an earlier version may have been copied at some point)
Finally if we want to customize the icon that the package will use we can add it here.
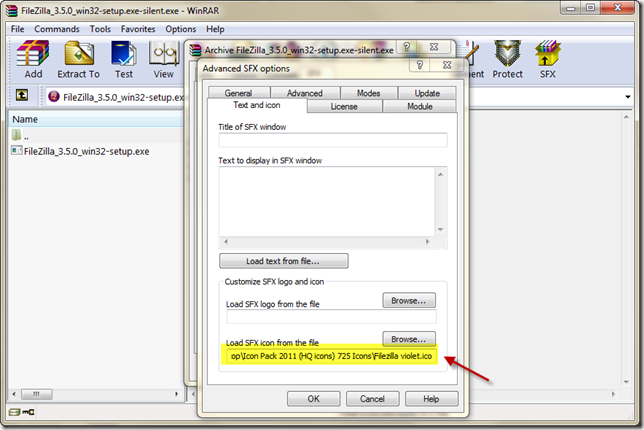
Select OK
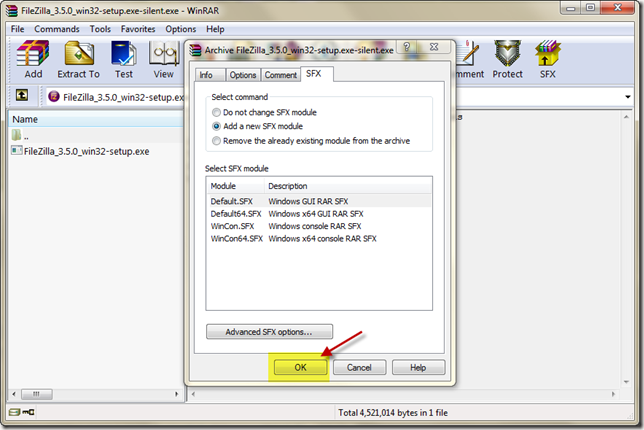
The new filezilla silent install package with its customize icon are now ready for use.

Make Your Own Offline Installers Using WinRar
If this sounds like you, fear not. Today we’ll show you how to create your own offline installers for almost any program using WinRar. Plus, we’ll provide you with some instantly downloadable offline installers for some of the most used apps on the web.
You will need:
- WinRar – Download Here
- The program for which you want to create an offline installer already installed on another computer
- Basic knowledge of 32- and 64-bit architecture regarding Windows Program Files
Locating the Program Files for Your Application
Step 1
To begin, run WinRar as an administrator. To do this, Right-click its shortcut icon (or executable file) and choose Run as administrator. (Skip this if you’re running XP).

Step 2
From within WinRAR, navigate to the directory where the program you want to create an offline installer for is located.

The installation directory for your application will vary depending on whether it’s a 32-bit or 64-bit app. If you’re not sure if you are running a 32-bit version or 64-bit version of Windows, Click Start and Right-click Computer and choose Properties. It’ll be listed next to “System Type.”
For 32-bit Windows operating systems your programs will be in C:Program Files
For 64-bit Windows operating systems, your programs will likely be in C:Program Files (x86). Note, however, that 64-bit Windows systems can run both 32-bit and 64-bit apps, so if it’s not in C:Program Files (x86) check in C:Program Files.
From this folder, look for the name of the application or the name of the publisher. For example, if you’re looking for Photoshop, it’ll be in the Adobe folder, i.e. C:Program FilesAdobeAdobe Photoshop CS5. Some applications aren’t located in sub folders, i.e. C:Program Files (x86)Opera
Step 3
Click the folder that contains the application to select it.

Step 4
Right-click the folder and choose Add files to archive.

Configuring Your Offline Installer
Step 1
The Archive name and parameters window will open. Click the General tab. Check the box next to Create SFX archive.

Step 2
Click the Advanced tab and Click SFX options…

Step 3
In the General tab of the Advanced SFX Options… window, Type the folder path where you’d like the program to install into the Path to extract field. You can choose whichever path you’d like, but the most logical place is in Program Files. You can type it in manually—for 32-bit programs this will be C:Program Files or C:Program Files[developer name]. For 64-bit programs, this will be C:Program Files (x86) or C:Program Files (x86)[developer name]—or you can Select Create in “Program Files” or type %programfiles% in the field. This will automatically detect the Program Files folder on the target machine. Note: It’s not necessary to add the application name, since you’ll be including the entire folder in the archive.
Also, make sure you Check Save and restore paths.

Step 4
If you’d like to add installation instructions, notes or a custom icon, you can do so in the Text and icon tab. This text will appear when the user runs the offline installer.

Step 5
Click OK to close the Advanced SFX Options windows. Click OK again in the Archive name and parameters window to create the archive.

Testing Your Offline Installer
Once the archiving is complete, your offline installer will appear in the target location. If you didn’t choose one, it’ll be in the same folder as the source folder.

Always test your offline installer before distributing them to your friends, family, co-workers and clients! Find yourself a computer where the application you archived is not installed and test out your installer there. In my test, I found that Skype works just fine with my offline installer and I can freely carry it around on my USB thumb drive just in case.

Conclusion
As you might’ve gathered, this isn’t a perfect solution. Essentially, you’re just making a self-extracting archive that saves the end user from the work of unzipping the file and choosing a directory. There are some pros and cons to this method:
Pros:
- Quick and easy for you and the end user.
- Packages all the necessary program files in a single archive for easy copying onto a thumb drive or CD.
- Install file is its own executable—no need to install WinRAR or any other software on the target computer.
Cons:
- This method may not work for all applications since some applications require additional integration into Windows (i.e. access to system files, altering of Windows registry keys).
- Doesn’t automatically create a shortcut on the desktop or in the Start Menu.
- The program can’t be uninstalled using the Add/Remove Programs dialog. To remove it, you must delete it directly from the Program Files folder.
Thursday, August 25, 2011
Get DaRT to Launch Remote Connections Tools Automatically
- From Windows 7 start menu, run “DaRT Recovery Image”.
- Go through the wizard up until you get to the “Additional Files” page. Note: Don’t forget to enable Remote Connections or else starting the Remote Connection tool at startup will have no effect.
- The “Add additional tools” page in the wizard will allow you to customize DaRT to your heart’s content. At this point click the “Show Files…” button.
- Navigate to the WindowsSystem32 directory within this temporary folder
- Modify the “winpeshl.ini” file permission to give “modify” permissions to your current user.
Open the “winpeshl.ini” file and modify the file to look like below:
[LaunchApps]
"%windir%\system32\netstart.exe -network -remount"
"cmd /C start %windir%\system32\RemoteRecovery.exe -nomessage"
"%windir%\system32\WaitForConnection.exe"
"%SYSTEMDRIVE%\sources\recovery\recenv.exe"
Save the newly created iso file and extract the wim from it and switch it into your recovery folder as I showed HERE. Now when you startup the PC by pressing F8 and selecting Repair this Computer the remote connection screen starts automatically as shown below. The end user only needs to supply the technician with the Ticket number, IP and Port and he can connect and repair the system.
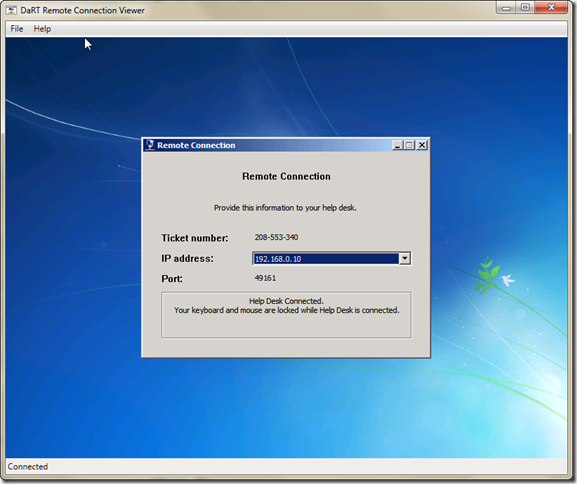 Note: If you cancel the remote connection screen at the local workstation, the script will continue as normal, prompting for a language selection and administrator password before launching the System Recovery Options Screen.
Wednesday, August 24, 2011
Using Dart 7's Standalone System Sweeper
Once you have launched Dart, select the Standalone System Sweeper

If you haven't updated your definitions in a while, you will be prompted to check for updates.

Once your definitions have been updated start a full scan.

Windows 7 Advanced Boot Options and Starting Dart 7
Start your computer and tap on the F8 key to get to the Advanced Boot Options Screen then choose “Repair your computer”
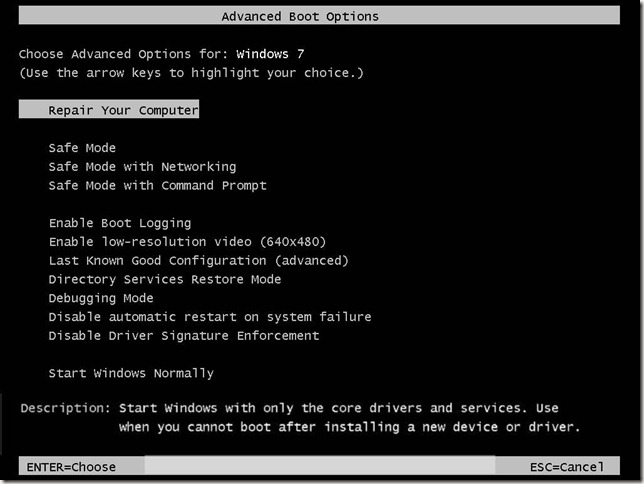
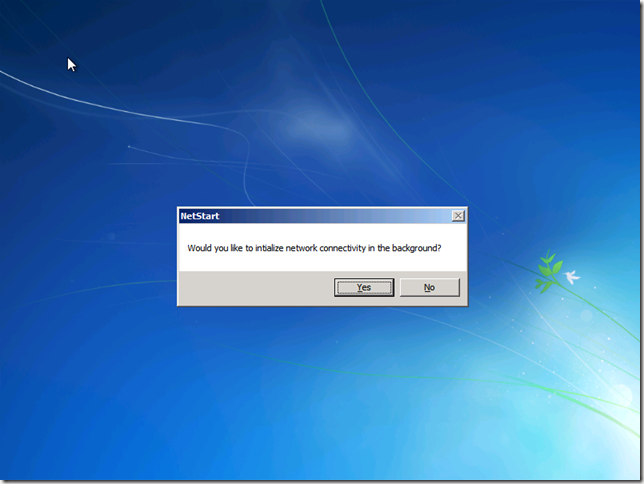
Since Dart 7 has been added to your default WinRE you now have the option to start network support at the start of WinRE. Choose YES
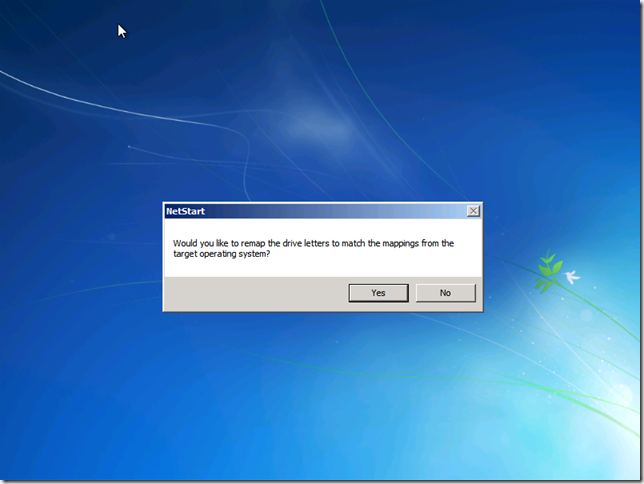
In a Windows PE environment your drive mappings will not have the same drive letters and this can be confusing.
Choose YES to remap them
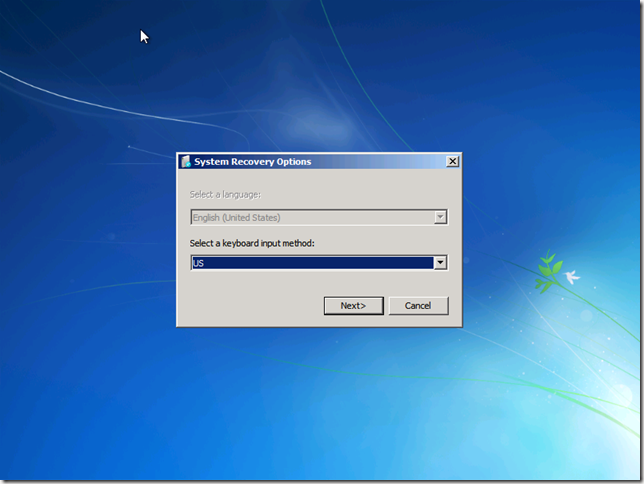
Select you Language and choose Next
You’ll notice that DART (Microsoft Diagnostics and Recovery Toolset) has been added to the WinRE menu
Select Microsoft Diagnostics and Recovery Toolset.
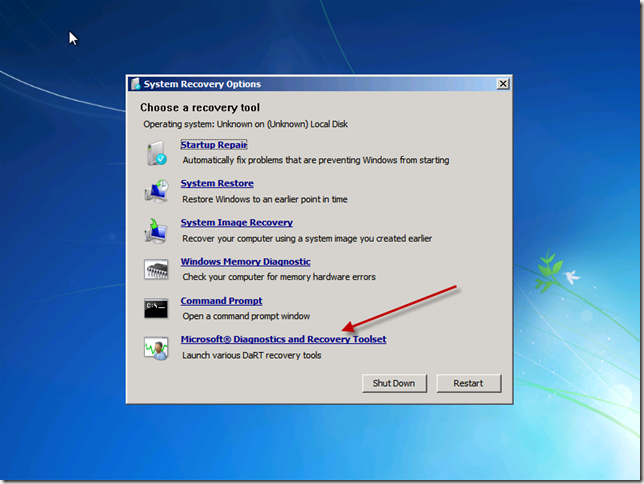
You now have 14 additional tools at your disposal. My favorites are below.
Locksmith (for those times when someone messes up their administrator passwords)
Standalone System Sweeper (for that nasty malware that’s difficult to clean while in Windows)
Remote Connections (have the user select this and you can remote in with the Dart Remote connection viewer and fix it all from your desk)
Check this blog if you want to have DaRT automaticaly start Remote Connections
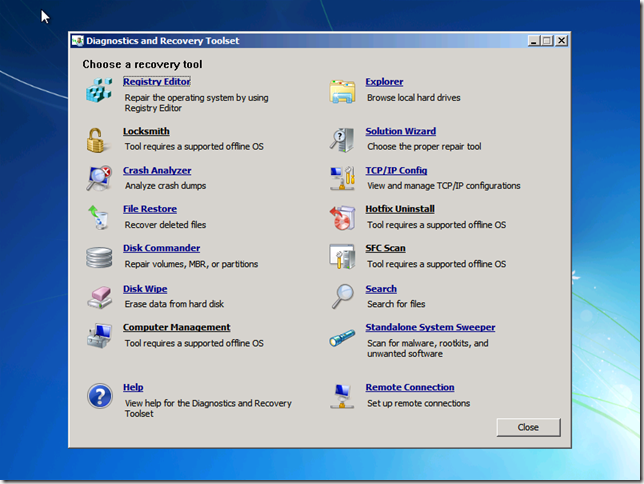
I will go into more detail on how to use some of these great tools in a future blog.


